Brewery Upgrade: HERMS System (Part 3)
The PID control box, temperature probe, and the water heating pot are ready (see parts one and two). The remaining jobs I need to complete are:
- Make a copper pipe coil
- Install fittings for the pipe work
- Test everything!
So, next up is some copper bending!
The parts used here are:
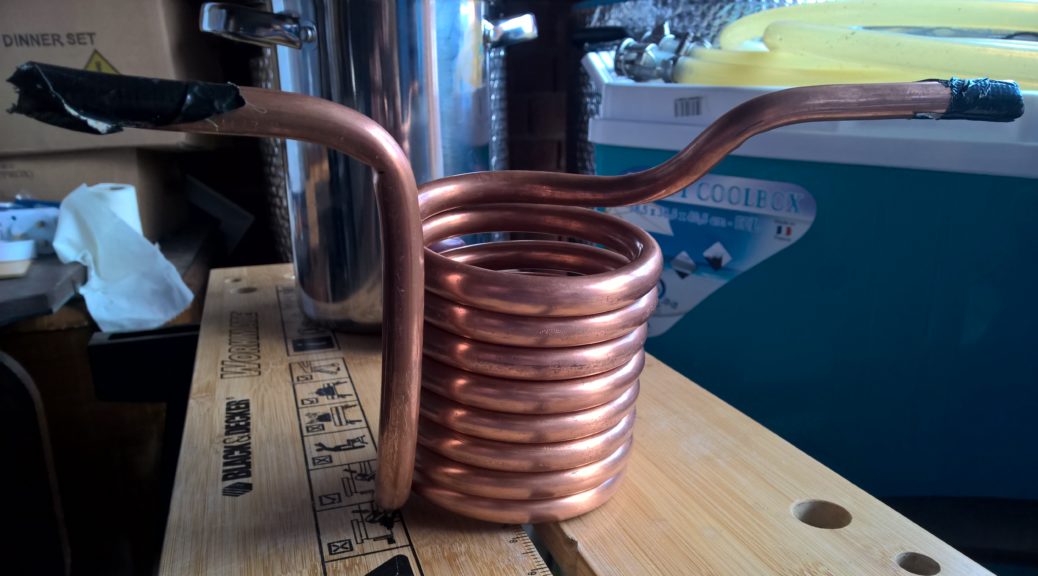
- 3 meters of 12mm copper pipe
- Kids play sand
- 2 x 1/2″ / 12mm compression fittings
- 1/2″ Tee piece
- A 500ml beer bottle
I first tried to bend the pipe around a paint tin. Bad idea! The pipe kinked and ended up partially crushing the paint tin. I looked around my garage for something sturdy & circular that would fit into the pot, and found a beer bottle was the ideal size when the thickness of the pipe is included.
This time, I followed the advice of others and borrowed some of the kids play sand. Unfortunately, the sand was damp but this was soon sorted by heating some of it in the oven for an hour.
I straightened out the pipe coil, taped up one of the ends of the pipe and slowly poured sand into it. I regularly stood the pipe up and banged the taped end on the ground to ensure it was packed down as tightly as possible. Once completely full, I taped up the other end.
I grabbed my beer bottle and gently bent the pipe around it – No kinks!


It turns out it takes a surprising amount of effort and a blister to turn a sand filled pipe into a decent coil, but I got there in the end. I basically had the pipe laid out on the ground ahead of me, and I was gripping the pipe and rolling it around the bottle, slowly forming a coil. After the first couple of turns I grabbed a towel to reduce the scratches the ground were making on the pipe.

Once the coil was formed, I placed it into the pot and marked on the pipe where I wanted 2 more horizontal bends to be placed. These 2 arms of the pipe will rest on the side of the pot, keeping it off the element.


Once the arms were formed, I just needed to fit the compression fittings and the tee piece. The tee piece will be used on the “out” side of the pipe. I’m going to fit a reducing bush and the PT100 temperature probe to the horizontal side and a camlock fitting to the vertical side which will feed back to the mash tun.

One thought on “Brewery Upgrade: HERMS System (Part 3)”